Materials
Birch plywood: what it is and how to cut it cleanly
At a glance
Birch plywood consists of thin veneers bonded with alternating grain directions. Its density, numerous glue lines and cross-laminated structure call for a fine-tooth blade with a pronounced alternate bevel, a moderate hook angle and carbide suited to abrasive bonded panels.
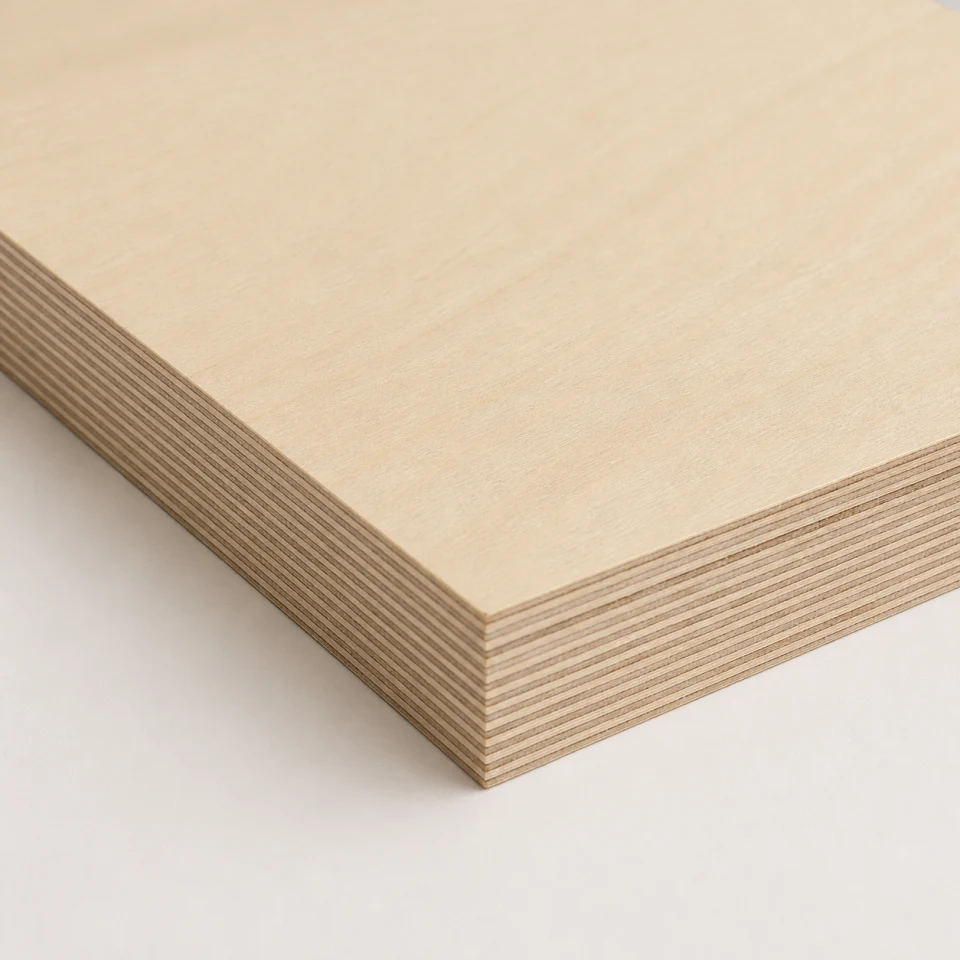
A stable panel made from opposing grain directions
Each veneer is rotated by 90 degrees relative to the next. The alternating grain limits movement in both directions and an odd number of plies keeps the construction symmetrical.
Baltic-style birch plywood uses thin, dense veneers with few internal voids. Its regular light-and-dark edge is often left visible, so edge quality is part of the finished product rather than a hidden detail.
The blade faces two separate challenges: the glue lines abrade the cutting edge, while unsupported cross-grain fibres can splinter where the tooth exits. These problems require different remedies.
How the panel is made
-
Peeling
A log rotates against a fixed knife to produce a continuous thin veneer.
-
Drying and grading
The veneers are dried and sorted; this determines the appearance grade of the finished faces.
-
Cross-lamination
Adhesive-coated veneers are stacked at alternating right angles. Exterior-grade phenolic glue is generally more abrasive than interior urea-based glue.
-
Hot pressing
Pressure and heat cure the adhesive into continuous, rigid glue lines.
-
Trimming and calibration
The pressed panel is squared and calibrated to its final thickness.
Typical number of plies
Two separate cutting challenges
When birch plywood is cut for the first time, edge wear and splintering are often treated as one problem. They have different causes and need different corrections.
The first is cutting-edge wear, caused mainly by the adhesive. Each glue line is a hard bonded layer crossed by the tooth on every pass; an 18 mm panel with thirteen plies contains twelve glue lines. Exterior phenolic adhesive is generally more demanding than interior urea-based adhesive. The wear is continuous, much like MDF, but concentrated at the bond lines rather than distributed throughout the board.
The second is edge splintering, caused by the alternating grain. Some veneers run parallel to the cut and others across it: the former separate readily, while unsupported cross-grain fibres tend to lift. The effect is strongest on the exit veneer—normally the underside on a table saw and the upper face when using a hand-held circular saw.
The distinction is practical. If the edge is ragged but the blade still feeds freely, check tooth geometry and workpiece support. If feed effort and heat increase, the adhesive has probably worn the cutting edge.
Face grades and their effect on cutting decisions
Face grading describes appearance, not the internal construction. It matters at the saw because it determines how much edge damage can be accepted or repaired.
| Grade | Face appearance | Typical use | Tolerance of splintering |
|---|---|---|---|
| B | Clear, uniform surface with virtually no defects | Exposed furniture and bespoke joinery | None: the component normally has to be remade |
| BB | Sound knots and small oval patches permitted | Interior work and painted components | Low: repairs remain visible |
| CP | Patches and minor discontinuities permitted; closed surface | Painted substrates and partly visible components | Moderate if the face will be covered |
| C | Open defects permitted; appearance not selected | Structural work, underlays and packaging | High where the edge is not a finish requirement |
Grades are written as a face/back pair. A B/BB panel has one B face and one BB face. Always orient the better face according to the side from which the blade exits.
Put the good face on the entry side
The visible face should be on the side where the blade enters the panel. On a table saw this is normally face up; with a hand-held circular saw it is normally face down.
For critical edges, place a sacrificial board firmly beneath the cut to support the exit fibres.
Blade features to look for
Compared with solid wood, birch plywood needs more teeth, a stronger bevel and a less aggressive hook angle.
-
High tooth count
More teeth reduce the amount removed by each tooth. On a 300 mm blade, Z72 is a sensible starting point and Z96 suits exposed finish edges.
-
Pronounced ATB geometry
Alternating bevels slice cross-grain fibres before lifting them. A 15-degree bevel generally finishes better than a 10-degree bevel; specialised high-ATB blades go further.
-
Moderate hook angle
A less aggressive hook reduces lifting at the exit face. Around 10 degrees positive is common on stable stationary machines; mitre saw blades generally use a negative hook.
-
Abrasion-resistant carbide
Repeated glue lines wear the edge. Exterior phenolic-bonded plywood is especially demanding.
-
Controlled kerf
A thinner kerf reduces power demand and lateral force, provided the plate remains stable for the feed rate.
-
Scoring blade for coated plywood
If the faces are laminated, the coating becomes the deciding factor: use the main blade with a correctly aligned scorer or a blade designed for scorer-free cutting.
Suitable blade families
| Family | Geometry | Typical use |
|---|---|---|
| LU2A | ATB 10° or 15°, H01K | Mixed solid wood and panel work |
| LU2B | Fine ATB, H00K | Clean edges on uncoated plywood |
| LG2B | Fine ATB, H00K | Compact range for the same finishing work |
| LU3A | High ATB 38°, H00K | Very clean edges without a scoring blade on limited thicknesses |
| FRWBC | ATB, HW K05S | Small table saws and workshop or site use |
| FRWT | Negative-hook ATB | Crosscuts on a mitre saw |
Carbide grades describe different balances between hardness and toughness; they are not a simple quality ranking.
Common mistakes
-
Using a ripping blade because plywood is wood
Low tooth counts and aggressive hook angles lift the face veneers and leave a ragged exit edge.
-
Ignoring panel orientation
Correctly positioning the visible face often improves the result more than changing blades.
-
Feeding extremely slowly
Excessively slow feed makes the teeth rub, increasing heat and edge burning.
-
Ignoring the adhesive type
Exterior phenolic-bonded panels can shorten sharpening intervals.
-
Treating coated plywood like bare plywood
A brittle face coating requires a scorer or a geometry intended for laminated panels.
Frequently asked questions
01 Why does birch plywood splinter easily?
It has many dense veneers with alternating grain. On the exit face, unsupported cross-grain fibres can lift before the tooth severs them.
02 How many teeth should a birch plywood blade have?
Use the upper end of the range appropriate to the diameter and thickness. For a 300 mm blade, Z72 is a useful starting point and Z96 suits visible finish edges.
03 Should the hook angle be positive or negative?
A moderate positive angle is common on stationary saws. A negative hook is appropriate on mitre saws because it restrains the workpiece.
04 Which way should the good face point?
Place it on the blade-entry side: usually up on a table saw and down with a hand-held circular saw.
05 Do glue lines really wear the cutting edge?
Yes. Every glue line is an abrasive bonded layer, and exterior phenolic adhesives are generally harder on the edge.
06 Do birch and poplar plywood require different blades?
The same blade family can cover both, but the required finish is different. Poplar is softer and more forgiving; dense birch reveals small defects along its exposed edge. If both materials are processed, select the blade and sharpening interval for birch—the result on poplar will still be suitable.
07 Does a sacrificial backing board help?
Yes. Firm support beneath the exit face reduces fibre breakout without changing blade or feed settings.
08 How should thin birch plywood from 4 to 9 mm be cut?
Use the highest suitable tooth count available for the blade diameter and support the panel continuously. At these thicknesses, theoretical tooth-count guidance can exceed any available product code; that means support and controlled feed become more useful variables than adding still more teeth.
Technical review
Filippo Perissinotto
Technical reviewer for wood and wood-based materials
Graduate in Wood Technology and Industries, technical consultant and wood-sector specialist.
The review covers the accuracy, clarity and consistency of information relating to wood and wood-based materials. Tool setup, machine operation and safety must always be checked against the manufacturer’s documentation and instructions.
Profile, qualifications and review methodRelated guides